FSM Operations
User must be the owner of the FSM to do the following steps. If not, ask from the current owner to release FSM in central or take FSM back local for you.
For any reason FSM should not be without an owner. Communicate with the technical shifter in CMS control room (LHC-Point5), when releasing the FSM in central or taking it back to local.
Inclusion of GEM FSM in CMS (Release FSM in Central)
Standard Method to Release FSM in Central
-
First inform the technical shifter of the intention to release the FSM in central.
-
Click on the button "Release Control" and confirm the release from local.
-
The technical shifter can see (in the central DCS screen) about the released FSM and he/she will include the GEM FSM in CMS (central).
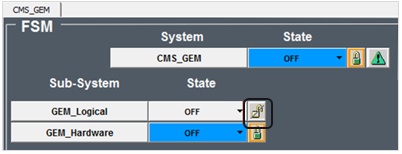
A gray color crossed and opened padlock in “GEM_Logical” node will be visible if the node is properly in the “Exclude&LockOut” state.
-
The FSM is in Central and the long tab will indicate the current owner, in this case, the technical shifter !
Alternate Method to Release FSM in Central
-
First inform the technical shifter of the intention to release the FSM in central.
-
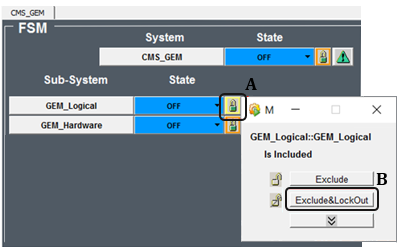
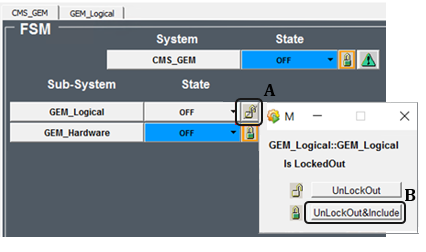
Click on the padlock in “GEM_Logical” node (A).
-
Click on the “Exclude&LockOut” button (B).
-
The technical shifter can see (in the central DCS screen) about the released FSM and he/she will include the GEM FSM in CMS (central).
A gray color crossed and opened padlock in “GEM_Logical” node will be visible if the node is properly in the “Exclude&LockOut” state.
-
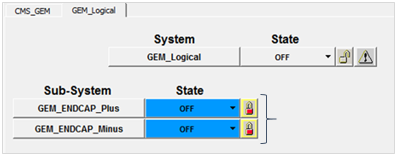
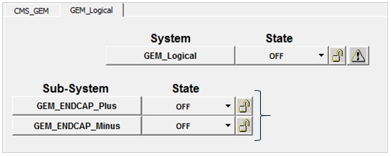
Go inside the “GEM_Logical” node, observe the red colored locked padlocks in “GEM_Endcap_Minus” and “GEM_Endcap_Minus” nodes which means that someone else owns these FSM nodes.
-
Now the FSM is in Central and the owner at the moment in this case is the technical shifter !
Exclusion of GEM FSM from CMS (Take FSM in Local)
Standard Method to Take FSM in Local
-
Inform the technical shifter of the intention to take the FSM in local.
-
Click on the button "Take Control" and confirm the release from local.
-
The padlock will become locked and color will be changed into green. At the same time, the technical shifter can see that you have taken the FSM.
-
Now the FSM is in Local and the green tab above the buttons will indicate you as the owner !
Alternate Method to Take FSM in Local
-
Inform the technical shifter of the intention to take the FSM in local and wait until technical shifter releases the GEM FSM from CMS.
-
If checked inside the “GEM_Logical” node, the gray color opened padlocks in “GEM_Endcap_Minus” and “GEM_Endcap_Minus” nodes will be visible.
-
Click on the padlock in “GEM_Logical” node (A).
-
Click on the “UnlockOut&Include” button (B) and then the padlock will become locked and change into green color. At the same time, the technical shifter can see that you have taken the FSM.
-
Now the FSM is in Local !
If clicked on “UnlockOut&Include” and recieved the following message, it means the FSM is still in central and the technical shifter has not released the FSM yet.
If this happens,
- Click “Dismiss” to close the message.
- Wait until technical shifter release the FSM or ask again to release the FSM.
- Then click on the padlock in “GEM_Logical” node and click on the “Exclude&LockOut” button.
- Click again on the padlock in “GEM_Logical” node and click on the “UnlockOut&Include” button.
FSM Actions
Sending Actions through the FSM
-
Click on the downward arrow in the field 'State' of the 'System' or the 'Sub-system' that expects to send the action through.
-
Select the action expected to be sent to other nodes from the available action options in the dropdown menu.
List of Possible Actions
High Voltage Nodes
Low Voltage Nodes
Gas Nodes
Sending Actions through the FSM (Lower Nodes)
-
Double click on the node to expand the lower nodes in a different tab.
-
Click on the downward arrow in the field 'State' of the 'Sub-system' that expects to send the action through.
-
Select the action expected to be sent to other nodes from the available action options in the dropdown menu.
List of Possible Actions
High Voltage Nodes
Low Voltage Nodes
Gas Nodes
Basic FSM Rules
The direct transition from OFF to ON for any HV node(and as a consequence for the GEM_Endcap node) is not permitted.
Lower states are always predominant, i.e. if there are 9 chambers ON with 1 in STANDBY, then the top node state will be STANDBY and the predominance of lower nodes will stay the same until the majority is not defined.
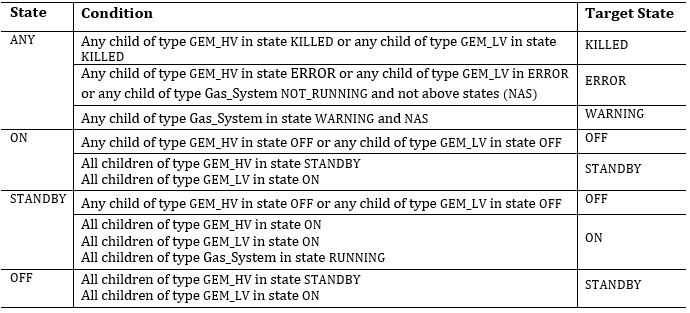
Complete set of rules defined for High Voltage, Low Voltage and Gas System nodes
High Voltage Child Nodes
- The HV_Chamber has a single child of type HVChannel
- The GEMINI_HV has 2 children of type HVChamber
- The GEM_HV has 5 children (for the Slice Test) of type GEMINI_HV
Rules for High Voltage Nodes
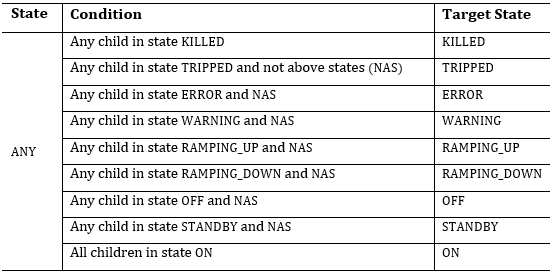
Low Voltage Nodes
LV Children Nodes
- The LV_Chamber has 3 children of type LVChannel
- The GEMINI_LV has 2 children of type LVChamber
- The GEM_LV has 5 children (for the Slice Test) of type GEMINI_LV
Rules for LV Nodes
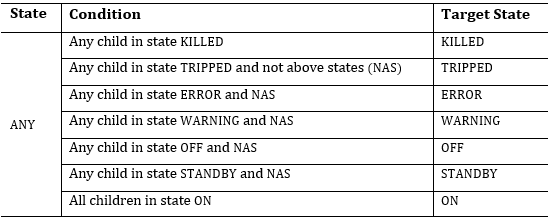
Gas System Nodes
Gas System Children Nodes
- The GEM_ENDCAP_Minus chamber has 3 children of type GEM_HV, type GEM_LV and type Gas_System
Rules for Gas Nodes
